

Unleashing the Potential of Samba: Your Ultimate Guide to Effortless File Sharing


Introduction
Ever found yourself struggling with file sharing between different operating systems?Enter Samba – an open-source wizard that effortlessly bridges the gap, enabling seamless file and print sharing across Windows, Linux, and Unix systems. In this guide, we'll embark on a journey to demystify the installation and configuration of Samba, empowering you to create a secure and efficient file-sharing service for your network.
What's Samba All About?
At its core, Samba is a suite of programs designed to make your life easier. It speaks the language of the Server Message Block (SMB) protocol, facilitating smooth communication between diverse operating systems. Imagine a world where your Linux server can effortlessly share files and printers with its Windows counterparts – that's the magic of Samba.
The idea of setting up a Server environment is to have a platform where resources could be shared among users on same network i.e. facilitating resources sharing and exchange for work and collaboration efficiency. Setting up Samba as a Server will help Team and aid collaboration as members could work remotely, exchange and utilize resources without physical present which could be a deterrent on workflow.
Getting Started – Installation
Before we dive into the Samba adventure, let's ensure your system is up-to-date. Fire up the terminal and type these commands:


Now, let's bring Samba into the mix by typing the following commands:

Confirm that Samba has successfully joined the party. Type these commands:

You should see a display similar to the below, depending on the version available as at the time of installation.

Share Management and Configuration
Now that you have confirmed the successful installation, it’s time to set the stage and create the directory where the file you intend to share with your group would be kept and access.
Run the commands:

Next is to change the File permission. Run the following commands:

It’s time to tailor the file-sharing experience by editing and customizing the global configuration file setting to match your network set-up.
Run the following command:

You may want to follow the below configuration for simplicity sake:

Test to confirm there are no mistake or error with the configuration setting by running the commands:

If there are no errors or misconfiguration, you should see a display similar to the below:

Starting Samba Daemon and NetBIOS(Network Basic Input/Output System)
Now run the following commands:


Add Users to the Samba Network and Create Password
To do this, run the following commands:


N.B: You can add as many user as you want, but be sure they are the necessary ones you want on the Samba network.
Allow Samba through Firewall

The above is necessary if you have firewall enabled on the machine. You either temporarily disallowed it or just add samba to the list of allowed daemon.
Connecting to Samba through Client
Congratulation, you have just successfully created a Samba network file sharing. Now you and your group can connect through your various client machines. Understand that, despite Samba NFS (Network File Sharing) been cross-platform, the accessing procedure and commands varies.
Here are some few of the commands for different OS (Operating System):
//smb:server-ip/ path/to/shared/folder – Ubuntu Linux
smb://server-ip/path/to/shared/folder – RedHat Linux
\\server-ip\path\to\shared\folder – Window OS
Steps to Sync Samba for File Sharing
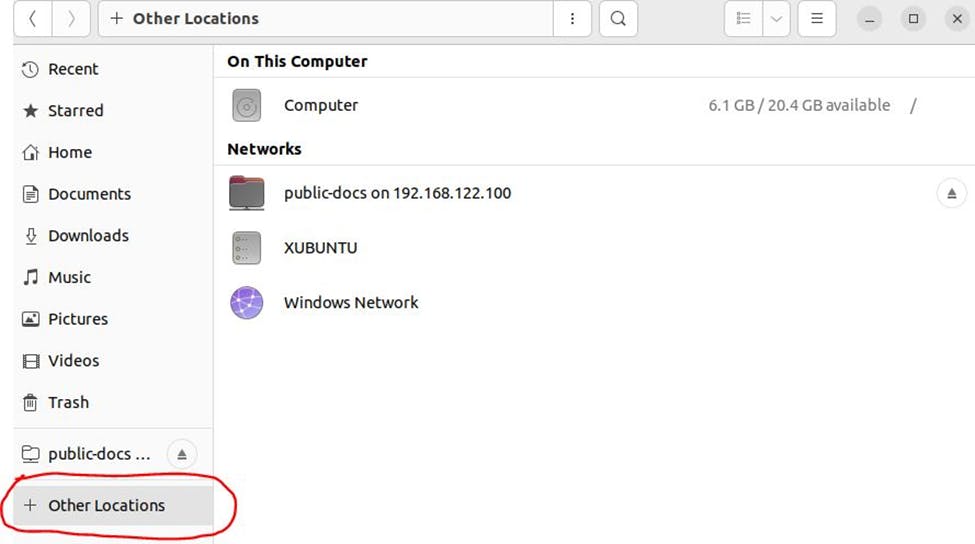
For Linux Client, locate the Application, ‘Files’ on your App list, from the display window, locate the path, Other Locations (located at the bottom-left corner of the pop-up window), then click.
Below is a screenshot for clarity.

That’s it. You and your team can now easily collaborate and share resources regardless of the platform or environment been used.